This article listed below relating to How to Install a Shower Drain is immensely enlightening. Read it for yourself and see what you think of it.
Upgrading a washroom is one of the a lot more preferred house improvement projects. Dealing with the plumbing for draining your shower can be exceedingly basic unless you overdo it.
Managing Your Own Shower Drainpipe Installment Task
You can physically build a collection agency for your brand-new shower, yet you actually require to think of it. Do you actually want to enter into the issues of getting the sloping appropriate, and also ensuring every aspect of it is water resistant? As well as I mean every facet! It is a lot easier to simply acquire a pre-cast enthusiast online or at your local Lowes, Home Depot or hardware shop. Structure one could seem like a great idea, yet you will possibly really feel in a different way after a couple of hours.
Regardless of just how you deal with getting a pan, you need to strive to use one that has the drainpipe situated in the same place as the original frying pan. Moving the drainpipe pipes can be a task, especially if the contractor made use of a distinct framework structure. If you are established to move the drainpipe, you are mosting likely to have to cut down the pipeline or lengthen it, which might suggest ripping up big pieces of the flooring. Rephrase, you are going to be considering a numerous weekend project.
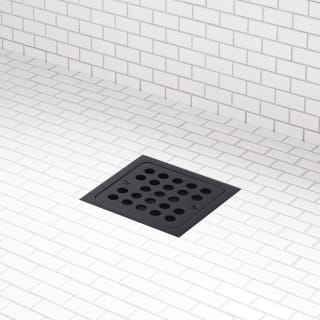
Assuming we have our drain aligned, the actual hook up is relatively straightforward. The drainage pipeline need to be dealing with upright up to the enthusiast. It will certainly typically resemble a "U", which suggests it works as a cleanout to keep unpleasant scents from coming back up from the drain. To attach the drain, you are mosting likely to produce a water tight connection in between a drain cap on the top of the frying pan as well as the water drainage pipe. Solutions differ, yet you are usually mosting likely to do this by placing a coupling item on the top of the drainage pipeline. This is after that covered with gaskets and also essentially screwed into the drainpipe cap. The drainpipe cap ought to act as a locknut, to wit, it screws directly onto the combining.
The challenging part of this procedure is obtaining your drain cap to match a watertight placement in the pan. This is achieved by backing off the drainpipe cap once you make sure everything meshes. At that point, you placed plumbers putty around the bottom of the cap and then screw it back on. The putty should develop a tight seal in between the cap as well as the shower frying pan, which keeps water from dripping under it and right into the framing under the shower.
Undoubtedly, washroom showers can be found in a variety of styles nowadays. If you purchase a collector, they almost always come with plumbing guidelines or the shop can note anything uncommon you ought to recognize. It seems complex, however is commonly rather simple. Have fun!
Whether you are a bath tub or shower individual, most people search for shower only alternatives when purchasing a residence. This straightforward truth indicates greater than a couple of home owners spend a weekend upgrading or setting up showers in their restrooms. The good news is for you, it is a relatively simple procedure.
An enthusiast or pan refers to the straight surface situated at the end of the shower. The collection agency typically contains a non-slip surface area slightly banked in the direction of the center or any place the drain is located. Incorporated with 3 to 4 inch wall surfaces around the side, the objective of your shower drainage plumbing is to get the water to flow to as well as down the drain.
Things to Know Before Installing a Shower Drain
Replacing a shower drain isn’t usually a difficult task, but it always pays to be prepared for complications before you start the job, especially as every project is different. While it should take just a couple of hours to replace a drain in a preformed shower base, you’ll want to allow yourself additional time and a flexible toolbox.
“As the age of the shower increases, so does the likelihood of problems during installation,” says Daniel O’Brian, the technical expert for leading online plumbing retailer SupplyHouse.com. Over time, older metal drains can corrode, making them very difficult to remove, and you can even run into problems with installations in newer showers if access to the drain is restricted. No matter what challenges you face, the following tips will help the project go a little more easily.
Prepare for pipe size discrepancies.
The majority of shower drainpipes are two inches in diameter, but if you have two-inch drains and you run into a three-inch drainpipe, you’ll be making another trip to the plumbing supply store. “Always check with local codes,” O’Brian suggests. “The larger drain size minimizes the chance of a shower overflowing.” And if you keep a supply of size-adaptable shower drains on hand, such as the Oatey 2-Inch or 3-Inch PVC Shower Drain, the size discrepancy won’t slow you down at all. This weld-type drain fits either a two- or three-inch drainpipe. With a two-inch drainpipe, the body of the drain fits over the pipe; with a three-inch pipe, it fits inside. If your home has three-inch drainpipes, it pays to pick up a box of size-adaptable drains to have on hand.
Assume you’ll have to cut through the ceiling.
In most cases, you won’t be able to avoid cutting through the ceiling below the shower to gain access. “If a leak is present, you’ll probably have to replace the drywall on the ceiling below as well as the drain, and you should take care of it as soon as possible to minimize damage,” O’Brian says. Drywall replacement is a relatively simple home repair project, so cutting a hole in the ceiling shouldn’t be a major concern. Alternatively, you can cover the hole with a return-air grill that can be easily removed if you need to access the plumbing at a future date.
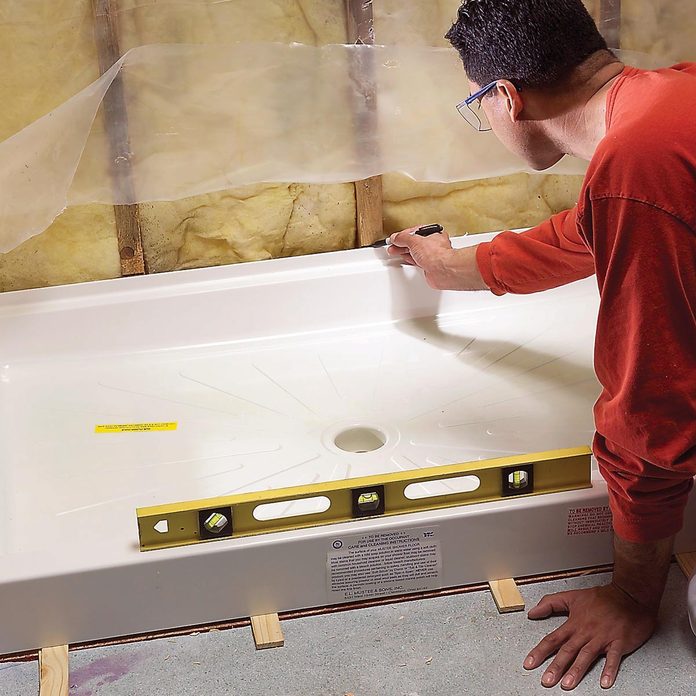
The only time you won’t need to cut through the ceiling below the shower is when you’re replacing both the drain and the shower base. In that case, start by pulling out the old shower pan and removing the old drain. Then, connect the body of the new drain to the new shower base, and set the shower base in place according to the manufacturer’s specifications. Be warned: Balancing the shower base while you align the drain body over the pipe will almost certainly require the help of an additional person.
The best type of drain for this situation is often called a “compression,” or “friction,” drain, such as this Oatey 2-Inch PVC No-Calk Shower Drain, which features a rubber gasket inside the drain body. Remove the gasket before the shower base is set. After the shower base is set, lubricate the gasket with plumber’s soap and slide it into place between the drain body and the pipe. Tighten the compression nut inside the drain body with a screwdriver to seal the connection, then snap the strainer into place. Being able to remove the gasket before you set the shower base gives you a little more room to maneuver—remember, you’re balancing the shower base while you’re trying to fit the connected drain body over the pipe in the floor.
Tight spots spell trouble.
It doesn’t happen often, but occasionally when you cut through the ceiling below the shower you find wiring or pipes that prevent you from getting your water pump pliers firmly on the nut that connects the drain to the pipe. (These additional wires, pipes, and even ductwork would have been added after the shower was installed.) If you can’t find a way to remove the nut or reach the pipe to cut it below the drain, you may end up having to pull the shower base out so you can access the drain from the top. Then, just like that, what should have been a simple drain replacement turns into a major project.
While you may be stuck with this unanticipated problem, you can prevent it from happening in the future by installing an outer locknut-style drain, such as the Sioux Chief 2-Inch JackRabbit Shower Drain .
Unlike standard drains that solvent weld or attach with a nut, the JackRabbit drain attaches via four jacking screws from below. (It’s usually much easier to get a screwdriver in a tight spot where bulky water pump pliers won’t fit.) The drain body features a push-on compression gasket that attaches to the drainpipe without the need for caulking. After the shower base is set, tighten the jacking screws from below to suck the flange downward until it seals against the shower floor.
Sometimes it’s easier to replace the whole trap.
Whenever you’re installing a shower drain with welded connections, you have to cut the drainpipe to remove the old drain. While this is necessary, it leaves you with a shortened drainpipe that you’ll need to extend before you can install the new drain. Trying to extend the pipe while you’re working overhead in a tight space is both time-consuming and physically challenging, so it’s often quicker (and simpler) just to cut out the entire drain trap and replace it. To install another weld-type drain, such as this 2-Inch Sioux Chief PVC Drain, you’ll want to assemble and dry fit all the connections before you glue them together. Be sure the angle of fall on the horizontal drain pipe remains the standard ¼ inch per linear foot.
Take care not to block weep holes.
Installing a new drain in a tiled shower is another scenario that often necessitates replacing the entire shower floor. Tiled showers rest on a mortar bed laid over a waterproof membrane (such as the Oatey 5’ x 6’ PVC Shower Pan Liner) that’s installed over yet another mortar bed. Because of this construction, a cemented-in shower drain cannot be replaced unless the tiles and the mortar around it are also removed and then reconstructed.
Tiled showers offer another complication: Because grout can crack, it’s important to have a backup plan to catch any water that might leak through. For that reason, shower drains designed for installation in tiled showers should have weep holes in their middle section to direct any water that reaches the membrane into the shower drain. These applications require a drain that has weep holes, such as the Oatey 2-Inch or 3-Inch PVC Shower Drain. To install, attach the base of the three-part drain to the drainpipe before the first mortar bed is smoothed into place. Then, install the membrane over the mortar bed (and over the drain base) and cut out a section over the drain hole in order to attach the center part of the drain, on which the weep holes are located. Make sure the section with the weep holes does not get clogged with mortar. To ensure that water will be able to flow through the weep holes, place several handfuls of pea gravel around the base of the exposed drain to protect it from the next layer of mortar. If you take these precautions, once the shower floor has been tiled, any water that makes its way to the membrane will exit through the weep holes and down the drain rather than leak out elsewhere.
https://blog.supplyhouse.com/5-things-to-know-before-installing-a-shower-drain/
I'm just very involved in How to Install a Shower Drain and I really hope you appreciated the entry. In case you liked our page plz make sure you remember to share it. I praise you for your time. Please pay a visit to our blog back soon.
Comments on “Beginning Your It Shower Drain Setup”